Tutorial 2.2: Mapping a video clip to Source 3
Continuing Tutorial 2, we will now add a video clip to Source 3 so that the background is no longer black.

Selecting media options
To add a video clip to Source 3:
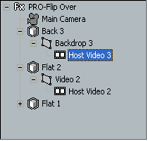
1. Double click on the Back 3Object![]() icon in the
icon in the ![]()
Tree panel.
2. Double click on the Backdrop 3 Surface ![]() Icon to expand out the Media
Icon to expand out the Media ![]()
file.
3. Click on the Select File button in the Media Options panel.
4. Using the file requester, select a video clip to use for Source 3.
5. Click on the Play Once button in the Monitor window.
You have selected a new video source and should be able to see it in the background as Source 1 flips over to Source 2. You should also make sure the field interpretation is correct for this video.
To change field Interpretation: Click on the Interpret popup, and select the proper field interpretation for your video. For most video capture cards you will select Interlaced – Upper First or Interlaced – Lower First.
While correct interpretation is not important in the preview, it will be important for final rendering. If interpretation is not set correctly, the video in the background will playback incorrectly (it will jitter rather than playing smoothly).

Media Options panel, showing the Interpret field
From now on, when you select a video file, the Interpret value will be defaulted to the last option selected. You will only need to change Interpret if you select a single image file, or video captured using a different video card.
ð Back to Tutorial 2.1
ð Up to Tutorial 2
ð Forward
to Tutorial 3