Warp – Displacement Map
The Displace plugin uses a gradient or other image to move (displace) polygons away from their normal positions. This plugin can be useful to create 3D terrain or other interesting results. For those with advanced understanding of 3D modeling, the vertexes of the polygons are moved along their normals (perpendicular to the polygon face).


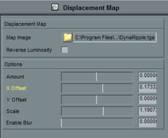
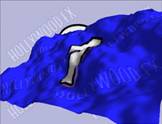
Displacement Map options and example
Map Image
When clicked, a file requester will appear. Select a bitmap image (.bmp, .png, .tga) to use as the displacement map for the selected object. Gradient images are especially useful as displacement maps. The brightness of the image is used to displace the polygons in the object. The brighter the pixel, the more it moves the polygon.
Reverse Luminosity
Checking this reverses the brightness of the image, so that areas that were dark in the image are now bright. This changes the displacement, since polygons are displaced more for brighter parts of the image.
Amount
This slider controls the amount of displacement. The higher the value, the more polygons are displaced from their original position. It is very useful to keyframe this value over time to create animation of the displacement.
X Offset and Y Offset
These sliders change the “position†of the displacement image in relation to the polygons of the object. Adjusting these sliders will move the displacement over the face of the object and can be animated for interesting results.
Scale
This slider changes the “size†of the displacement image in relation to the polygons of the object. Making this a higher value is like zooming in on the displacement image. You can create some interesting animated effects by keyframing this value.
Enable Blur
Enabling blur makes the displacement of the polygons smoother. When checked, a slider will appear where you can adjust the amount of smoothness. The higher the blur, the more time it takes to calculate the displacement.